If you are having problems with email spam, whether it be the occasional promotional mail, or 100’s or even thousands of emails spamming your inbox each hour, Email Spam Protection can help.
SpamAssassin is an open-source Apache Project located in cPanel under the Spam Filter settings. The source was first made widely available in April 2001. If you are more technically-minded and want to see how it has evolved over the years, you can see a full change history here.
It works by using a variety of spam detection methods, including:
- DNS-based and fuzzy checksum-based spam detection
- Bayesian Filtering
- Sender Reputation System
- Whitelists
- Blacklists
- Online Databases (DCC, Pyzor, Razor2)
- Body phrase tests
- Header tests
- Character sets and locales
These spam detection methods are applied to email headers (an excellent guide to finding email headers) and content to classify the email using various statistical methods. They are designed to block unwanted email messages before they reach your inbox and evolve to combat the changing ways spammers get to your inbox.
It is a far cry from the keyword-based spam detection systems used prior.
I will first go through a short cPanel tutorial showing how to enable the Spam Filter and then go through the different SpamAssassin configuration options.
How to Enable the SpamAssassin Spam Filter in cPanel
- I am assuming you have already logged in to cPanel, but if you haven’t yet, please do so now.
- Scroll down to the “Email” section of the administrative dashboard.

As of version 70 of cPanel, Apache SpamAssassin was renamed to “Spam Filters” in the dashboard.
- Click on “Spam Filters”

- Turn on the Spam Filters by toggling the “Process New Emails and Mark them as Spam” option at the top of the page.

If successful, you will see a green box appear confirming the following:
Success: Apache SpamAssassin has been enabled.

At this stage, all you have done is enable the Spam Filter. When you receive emails, messages with a score of 5 (default score) will be marked as spam.
If the email is found to be spam, the word ***SPAM*** will appear at the start of the subject field, as shown in the screenshot:

Unless you configure SpamAssassin to auto-delete or move the spam to the junk folder (I’ll cover how to do this shortly), No other actions will occur, and the message will remain in your inbox.
How to Configure the SpamAssassin Score Setting
An email message spam score is calculated on a scale of 1 to 10. The higher the SpamAssassin Score, the more likely it is to be spam. If a message’s calculated spam score meets or exceeds the Spam Threshold Score, the system will label that message as spam.
The Spam Threshold Score and Auto-Delete Threshold Score (I’ll cover this shortly) are different and, as such, do not affect each other.
- Click on “Spam Filters”

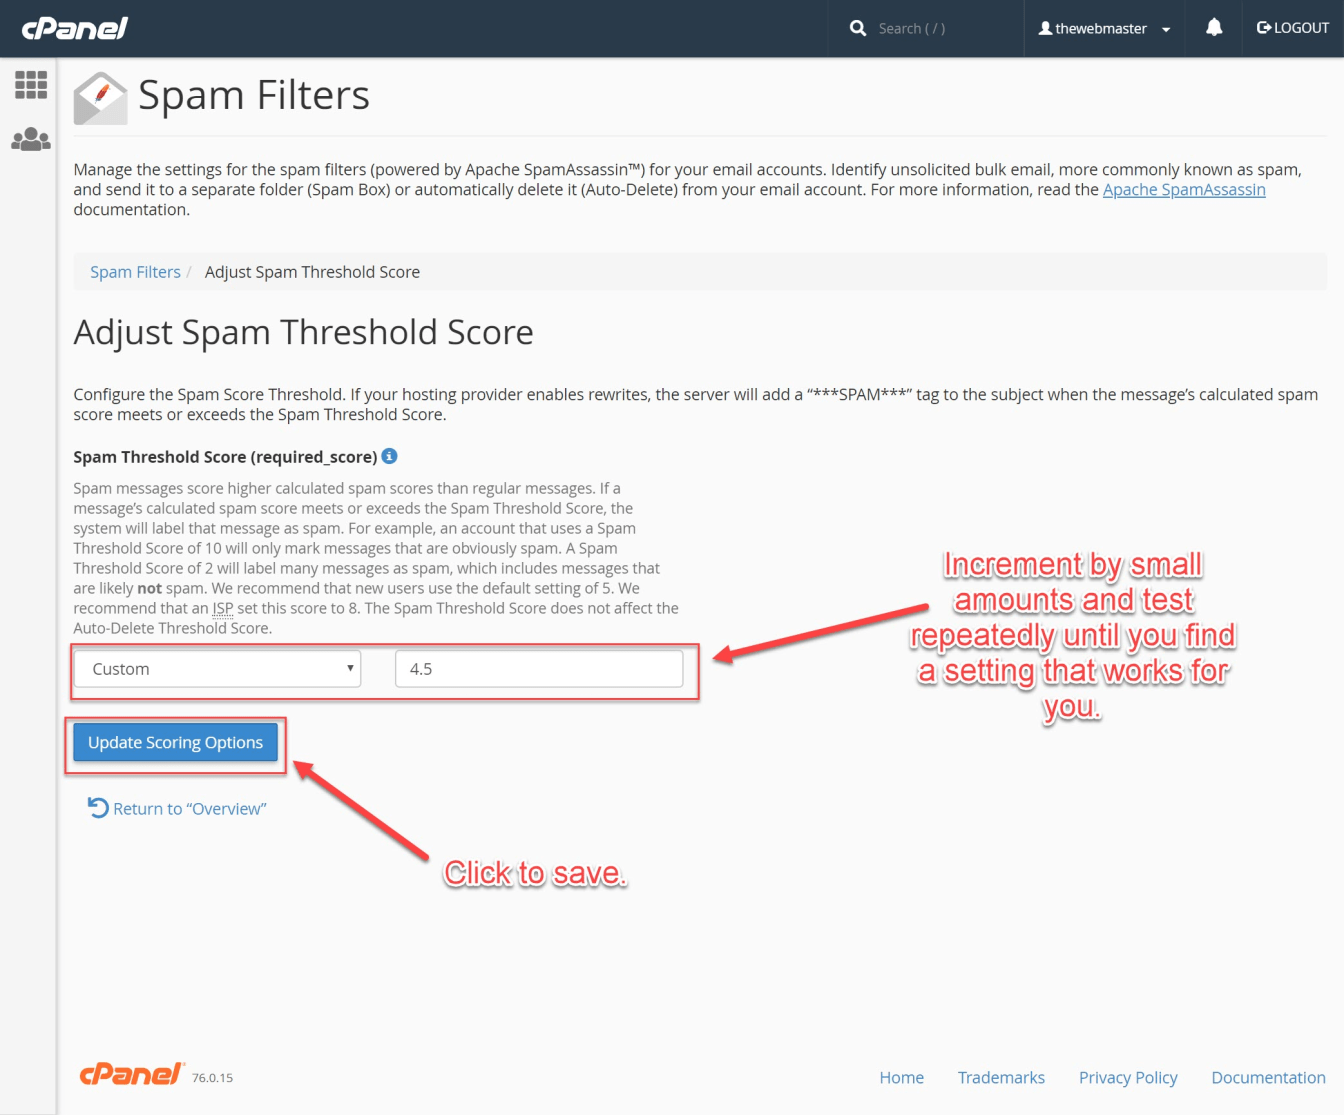
- To Adjust the Score, you will need to click on the “Spam Threshold” link, as shown in the screenshot.

In cPanel, you can adjust the Spam Threshold Score to one of the following settings or a custom number between 1 and 10:
- Score 1: Aggressive - This will mark many legitimate emails as spam. I.e., Many false positives.
- Score 4: Recommended for well-tested servers
- Score 5: Default
- Score 8: Recommended for Internet service providers
- Score 10: Passive. This will catch only the most obvious spam.
- Custom Score: Any score between 1 and 10, configurable to two decimal places. This enables you to fine-tune the SpamAssassin Score setting if you continue receiving spam emails.
I recommend keeping the Score at the Default level and only adjusting it if you still have a problem with spam emails.
For example, using the custom score so you can increment it in small amounts:
- Lower the score if you find Spam emails are still making it through the filter.
- Raise your score if you find that emails from your contacts are filtered by mistake.
Once you have changed your score, click “Update Scoring Options” to save it.

How to Configure SpamAssassin to Move Spam to Junk Folder (Spam Box)
When Apache SpamAssassin is enabled, you may want to move spam to a different folder. This option will automatically move any message above the Spam Threshold Score into the “Spam” folder. You can then review the spam messages and adjust the Spam Threshold Score to fine-tune them.
- Click on “Spam Filters”

- Toggle the “Move New Spam to a Separate Folder (Spam Box)” to “on.”
Everything should now be set up.

This optional step covers the additional options available for the Spam Box. I say optional because all it does is allow you to easily empty the Spam box, either in its entirety or by deleting individual messages.
You have a couple of options here:
- To delete all Junk Mail, click “Empty all Spam Box folders.”
- To search for specific spam messages, or delete them by certain characteristics, click on the “Manage Email Disk Usage” option. You will then be able to manage disk usage, including the Junk Folder.

How to Configure SpamAssassin Auto-delete
No email filtering system is 100 percent perfect (you can read an interesting discussion on the StackExchange about that here).
While spam filters try to catch all spam emails, Spammers are continually adapting to create emails that are trusted not to be spam by automatic filters and humans themselves. Spammers try to make emails that can bypass the filters, looks legitimate, it is opened, and look attractive enough so that a user clicks a link in the mail. It is a continuous battle.
As a result of the imperfection of email filters, I recommend that you do not use the auto-delete option unless you have to.
If you have a particular problem with email spam, you can set the auto-delete score to be higher than the spam score. This way, you can still set the spam filter to be quite strict and only delete the worst spam.
- Click on “Spam Filters”

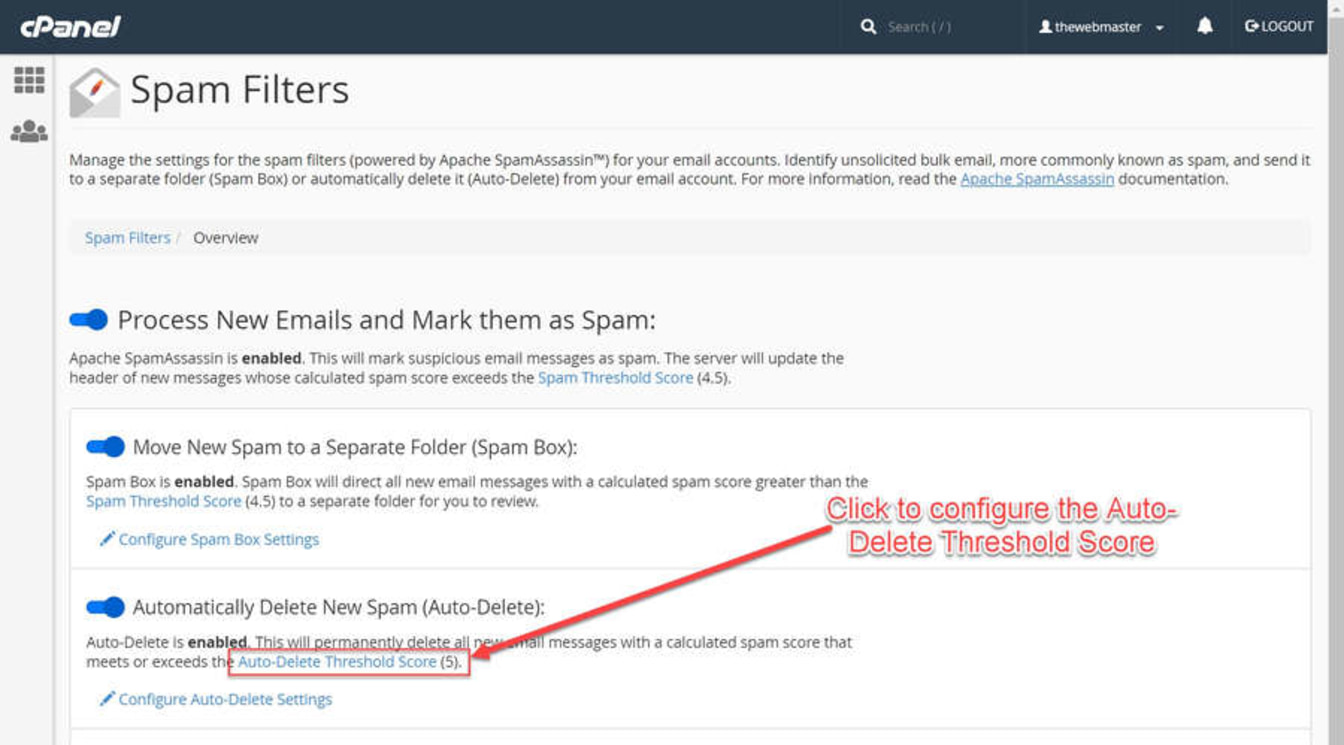
- To automatically delete spam messages above the Auto-Delete Threshold Score (this is different from the Spam Threshold Score), toggle the ‘Automatically Delete New Spam (Auto-Delete)’ setting.

- Click the link from the Main Spam Filters screen to go to the settings.

As I mentioned earlier, it is not recommended to use the Auto-Delete functionality. However, if you do, I highly recommend setting the score much higher than the Spam Threshold Score so you only delete the very worst of the Spam Messages.
The Default Auto-Delete Score is set to 5. I recommend a setting of 8 if you use this functionality.
- Click the “Auto-Delete”
- Click the “Update Auto-Delete Score” to save the setting.

Additional Configurations (For Advanced Users)
Here, you can configure the following settings:
- Whitelist emails
- Blacklist Emails
- Calculated Spam Score settings
I’ll go through each of these settings in turn:
How to Configure the SpamAssassin Whitelist
If you have an important client or friend or want to ensure you will receive a specific sender’s email, you need to whitelist their domain.
- Click on “Spam Filters”

- To see the complete list of Additional configurations, you need to expand the list by clicking the “Show Additional Configurations” link.

- Click the link to Edit the Spam Whitelist Settings.

When configuring the whitelist_from setting, you can use wildcards such as “*” and “?”. For example:
- [email protected] - Whitelists a single specified email address
- *@example.com - Whitelists all of the email addresses at example.com
- [email protected] - Whitelists a single character in the email address. So in this example, [email protected] would be allowed, but [email protected] would not.
Once you have entered your whitelist_from item, you can either add more or click the “Update Whitelist (whitelist_from)” button.

How to Configure the SpamAssassin Blacklist
If you get repeated spam from any particular email address, such as a mailing list you cannot unsubscribe from, you can blacklist that domain.
- Click on “Spam Filters”

- To see the complete list of Additional configurations, you need to expand the list by clicking the “Show Additional Configurations” link.

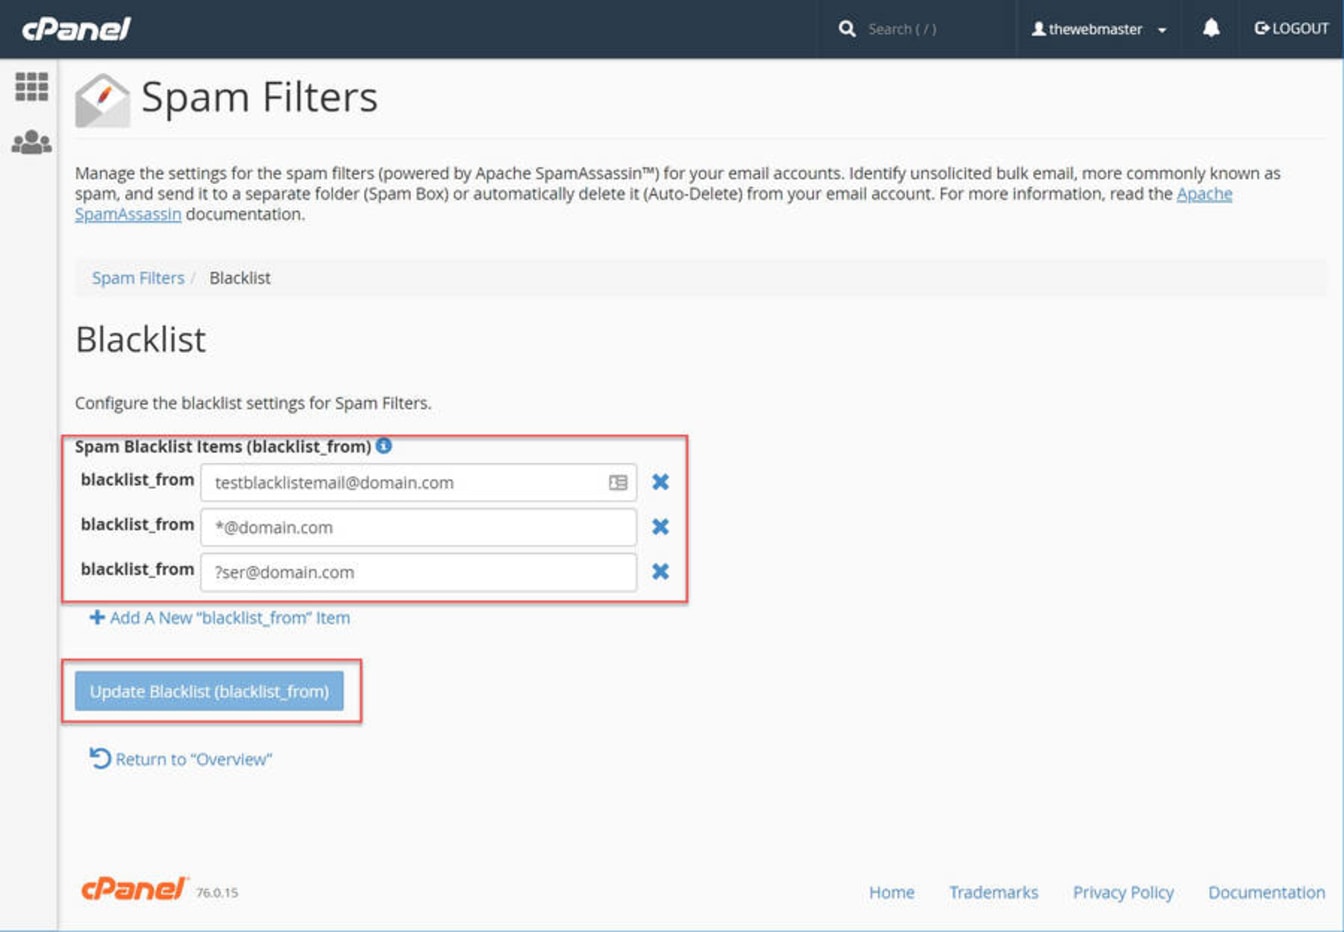
- Click the link to Edit the Spam Blacklist Settings.

When configuring the blacklist_from setting, you can use wildcards such as “*” and “?”. For example:
- [email protected] - Blacklists a single specified email address
- *@example.com - Blacklists all of the email addresses at example.com
- [email protected] - Blacklists a single character in the email address. So in this example, [email protected] would be allowed, but [email protected] would not.
Once you have entered your Blacklists_from item, you can either add more or click the “Update Blacklist (blacklist_from)” button.

How to customize the Calculated Spam Score settings (Advanced Users Only)
This is where you can configure different scores for the hundreds of different tests and assign a score to that test. For example, you can check popular spam email lists and set a “10” score to the Calculated Spam Score to ensure your Spam Filter always catches any email caught by that test.
I do not recommend you change any of these settings, but I will walk you through a couple that you may wish to consider if you have a particularly bad problem with spam.
- Click on “Spam Filters”

- To see the full list of Additional configurations, you need to expand the list by clicking the “Show Additional Configurations” link.

- Click the ‘Configure Calculated Spam Score Settings’ Link.

To review the default scores, run the following command at the command line:
grep -R score /var/lib/spamassassin/* | lessYou can also see the default scores by adding any of the Scores Items, as the score, when added, will be the default one unless you change it.
If I were to alter any of the default scores, it would be the following:
- URIBL_DBL_SPAM: Set Score to 10 - This checks whether there is a domain in the email body that matches an entry on the Spamhaus Domain Block List
- URIBL_WS_SURBL: Set Score to 10 - This checks whether there is a domain in the email body that matches an entry on the Bill Stearns URI Blacklist
- URIBL_BLACK: Set Score to 10 - This list contains domain names belonging to and used by spammers. This list has a goal of zero False Positives.
I recommend only using these revised settings if you have a particular problem with spam (my default recommendation is that no changes should be made). Also, I recommend monitoring your Junk Folder for any false positives after implementation.

